Difference between revisions of "Mushroom Valley"
(Added Speedrunning Guides bodies; refactored collapsed sections) |
m (updated) |
||
| (2 intermediate revisions by one other user not shown) | |||
| Line 9: | Line 9: | ||
| foodamount = | | foodamount = | ||
| publication = 2023 January 8 | | publication = 2023 January 8 | ||
| − | | description = Mushroom Valley is a pure parkour map on zero.minr.org, worth 4 points. Use / | + | | description = Mushroom Valley is a pure parkour map on zero.minr.org, worth 4 points. Use /join mwmv to join the map. |
}} | }} | ||
| − | Mushroom Valley is a pure parkour map by MOUTHWEST. It rewards 4 [[Points|FFA Points]] upon completion, and can be joined directly using “/ | + | Mushroom Valley is a pure parkour map by MOUTHWEST. It rewards 4 [[Points|FFA Points]] upon completion, and can be joined directly using “/join mwmv”. |
== General == | == General == | ||
| Line 34: | Line 34: | ||
{| class="mw-collapsible mw-collapsed wikitable" | {| class="mw-collapsible mw-collapsed wikitable" | ||
|+ style=white-space:nowrap | Flamango Route Overview | |+ style=white-space:nowrap | Flamango Route Overview | ||
| − | |- | + | |- style="background-color:#000000" |
| <p>The southwest plateau (Y=94) provides multiple paths to reach the next main layer (roughly Y=102). Once here, there are a few ways to reach the top of the central spire; the easiest route to Flamango will be described. Within the interior of the spire, there is a dripleaf next to the small hole in the wall. Standing on this to fold it and allowing the leaf to pop back up (which can be sped up with a button behind the leaf) allows the player to crawl into a small side room. Climbing the dripleaves and climbing the exterior will bring the player to the top of the spire.</p> | | <p>The southwest plateau (Y=94) provides multiple paths to reach the next main layer (roughly Y=102). Once here, there are a few ways to reach the top of the central spire; the easiest route to Flamango will be described. Within the interior of the spire, there is a dripleaf next to the small hole in the wall. Standing on this to fold it and allowing the leaf to pop back up (which can be sped up with a button behind the leaf) allows the player to crawl into a small side room. Climbing the dripleaves and climbing the exterior will bring the player to the top of the spire.</p> | ||
| Line 44: | Line 44: | ||
{| class="mw-collapsible mw-collapsed wikitable" | {| class="mw-collapsible mw-collapsed wikitable" | ||
|+ style=white-space:nowrap | Highest Route Overview | |+ style=white-space:nowrap | Highest Route Overview | ||
| − | |- | + | |- style="background-color:#000000" |
| <p>The highest route also requires the player to reach the top of the central spire, which is described in the Reaching Flamango section above. Once here, the player will need to turn 135 degrees to their right to face the top of the red mushroom near their feet. With a running start, jumping off the red mushroom and landing on the brown mushroom pad of the plateau below will give enough height to reach the top of a smaller spire further to the south. From here, the player can head east and use dripleaves to reach vines attached to a large decorative vine clump dangling from a branch overhead.</p> | | <p>The highest route also requires the player to reach the top of the central spire, which is described in the Reaching Flamango section above. Once here, the player will need to turn 135 degrees to their right to face the top of the red mushroom near their feet. With a running start, jumping off the red mushroom and landing on the brown mushroom pad of the plateau below will give enough height to reach the top of a smaller spire further to the south. From here, the player can head east and use dripleaves to reach vines attached to a large decorative vine clump dangling from a branch overhead.</p> | ||
| Line 116: | Line 116: | ||
==== Opening Bend ==== | ==== Opening Bend ==== | ||
| − | [[File:Opening Bend strats.png| | + | {| class="mw-collapsible mw-collapsed wikitable" style="width:100%; overflow:auto;" |
| + | |+ style=white-space:nowrap | Opening Bend Detail | ||
| + | |- | ||
| + | | style="width:75%" | | ||
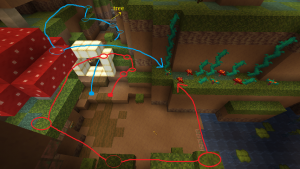
| + | '''Red path (optimal):''' Start gaining elevation near the starting ring. Reach the next platform from the top of the ring and go underneath the red mushroom. Continue crossing platforms horizontally until reaching the azalea. With this, do a 5-1 to reach the vine. | ||
| + | |||
| + | '''Blue path (suboptimal, but fast):''' Pass through the starting ring and gain elevation in front of the tree entrance. Backtrack to the red mushroom platform, where you will be above the start sign on top of the mushroom. From here, jump to the vine's platform. | ||
| + | |||
| + | '''Yellow path (suboptimal):''' Ascend the tree. This is a much easier route for beginners, and is faster than the main path. | ||
| + | | [[File:Opening Bend strats.png|frameless|Three best routes for the Opening Bend]] | ||
| + | |} | ||
==== Small Cave ==== | ==== Small Cave ==== | ||
| − | [[File:Cave strats.png| | + | {| class="mw-collapsible mw-collapsed wikitable" style="width:100%; overflow:auto;" |
| + | |+ style=white-space:nowrap | Small Cave Detail | ||
| + | |- | ||
| + | | style="width:75%" | | ||
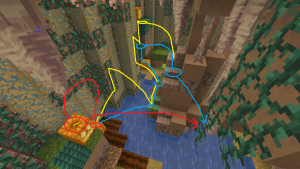
| + | '''Red path (optimal):''' From behind the upper pumpkin near the start, jam and jump off the corner of the pumpkin to reach the wall of vines. | ||
| + | |||
| + | '''Blue path (suboptimal, but fast):''' Jump from the lower pumpkin to the center column, then jump to the vines and climb up to the nearest platform. Jump back to the column to reach a higher layer, which gives access to the wall of vines. | ||
| + | |||
| + | '''Yellow path (easier variant of Blue path):''' If needed, jump from the lower pumpkin to the vines on the wall so you can fall onto the center column's lower shelf. Reach the vines and climb all the way up to the highest platform, which provides an easy jump to the center column's higher layer. Exit via the wall of vines. | ||
| + | | [[File:Cave strats.png|frameless|Three best routes for the Small Cave]] | ||
| + | |} | ||
== Challenges == | == Challenges == | ||
Latest revision as of 23:04, 5 January 2025
| Mushroom Valley | |
|---|---|
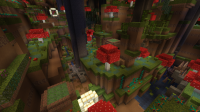
 A partial overview of Mushroom Valley from above the starting corner. | |
| Map information | |
| Reward | 4 FFA Points |
| Difficulty | Novice |
| Location | FFA |
| Mapcode | mwmv |
| Creator | MOUTHWEST |
| Publication | 2023 January 8 |
Mushroom Valley is a pure parkour map by MOUTHWEST. It rewards 4 FFA Points upon completion, and can be joined directly using “/join mwmv”.
Contents
General[edit]
Gameplay[edit]
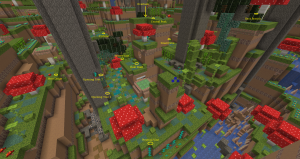
The map has many diverging paths, some of which are marked explicitly and some of which are hidden. There is a main path that leads from the start to the end, passing through the large golden rings and winding around the majority of the map.
Players can traverse the area by using the tops of large mushrooms, as the brown mushrooms have a large slime pad accessible at the top used for bouncing across large gaps. There are also plenty of vines in open areas, trees, and the cave rooms that need to be climbed to progress. Many paths contain dripleaves that force players to cross the area without stopping for too long.
Aesthetics[edit]
The map is captured within a large, rough bowl shape with ridges and spires scattered about. The area is primarily composed of "earthen" walls made from brown mushroom and dripstone blocks, which are topped by a checkerboard sheet of grass and moss. Large trees made of acacia wood expose their roots and some small branches (with dried kelp block leaves) before shooting high up beyond the thick canopy covering the map. Large red and brown mushrooms are densely packed within the area with use their corresponding block primarily for exterior color. Additionally, red mushrooms have yellow froglights under their caps, and brown mushrooms are topped with partially-exposed copper stairs and slimes with a glow lichen cover. Smaller red and blue fungus dot the map floor sparsely.
Occasionally, other features like waterways and bamboo-and-azalea walls appear. There are pointed dripstones serving as stalagmites and stalactites in wetter areas, such as the caves. Uniquely, caves also tend to have mushroom stem ceilings, dirt path floors, and jack-o'-lanterns. Other light sources are provided by the red mushrooms' froglights, the soul lanterns decorating interior corridor entryways, and glow lichen. Small amounts of daylight may cross through the canopy into the map.
Paths are decorated such that intended mechanics are made more apparent. At the beginning of the map, the ending ring, which looks identical to the starting ring, is visible by looking forward while crossing through the starting ring. The main path has a width of discoloration that distinguishes it from the standard patterns of the textures. In some instances where the main path is harder to follow, colored arrows appear on the ground or on nearby surfaces. Vine walls within caves and cave-like rooms have darker blocks behind the vines so that they stand out against the lighter glow lichen. The boundary of the map is marked with a perimeter of warped fungus, though the features and obstacles of the map appear to continue onwards toward the steep outside walls.
Exploration Guides[edit]
The following sections explain how to reach certain "secret" areas or analyze (preferably) optimal pathing; these sections will be collapsed by default for the sake of those who want to discover these on their own.
Reaching Flamango[edit]
The southwest plateau (Y=94) provides multiple paths to reach the next main layer (roughly Y=102). Once here, there are a few ways to reach the top of the central spire; the easiest route to Flamango will be described. Within the interior of the spire, there is a dripleaf next to the small hole in the wall. Standing on this to fold it and allowing the leaf to pop back up (which can be sped up with a button behind the leaf) allows the player to crawl into a small side room. Climbing the dripleaves and climbing the exterior will bring the player to the top of the spire. From here, the player can fall onto the bamboo wall on the right next to the entrance to the hollow tree. If the player climbs up the tree from the inside, they can jump to the large red mushroom. With the use of two dripleaves, the player can reach a ledge that has a small corridor hidden behind the earthen wall they just passed. At the end of the corridor is Flamango and a flamingo. Interacting with Flamango's head will display a message to the player. |
Crossing the Highest Route[edit]
The highest route also requires the player to reach the top of the central spire, which is described in the Reaching Flamango section above. Once here, the player will need to turn 135 degrees to their right to face the top of the red mushroom near their feet. With a running start, jumping off the red mushroom and landing on the brown mushroom pad of the plateau below will give enough height to reach the top of a smaller spire further to the south. From here, the player can head east and use dripleaves to reach vines attached to a large decorative vine clump dangling from a branch overhead. After ascending the vines to reach the top surface of the branch, there is a turn jump on the left that's needed to gain access to the interior of the tree. Falling down within the hollow tree section will not allow the player to recover their position, so they will have to start again from the spire top. The player, if successful, will climb the interior vines and reach the large branch hanging over the center of the map; this is the highest point accessible in the map. The highest route allows almost all of the northern-most obstacles to be skipped. From the branch, the player can jump onto the bamboo wall that's on the central spire. Then, they can jump onto the brown mushroom to their northeast and just barely have enough height and distance to land on the top of the red mushroom on the overlook. The nearby tree branch allows access to the exit path of the northern-most cave, which puts the player only two meaningful jumps away from the end of the map. |
Speedrunning Guides[edit]
Macro Routes[edit]
There are a few "anchor" positions in the map that are almost certainly used when taking specific sub-routes; timing sub-routes from anchor to anchor allows a construction of the fastest possible routes.
| Starting Anchor | Ending Anchor | Brief Description | Additional Notes |
|---|---|---|---|
| Start | Plateau Vine | Requires circling around the start sign while gaining elevation | Likely optimal |
| Start | Opening Tree 1 | Straight shot to and up the first tree | |
| Start | Secret Vine | Past the slime wall; involves dripleaf jumps and a headhitter azalea jump | |
| Plateau Vine | Hole Shelf | Uses the nearest azalea, a dripleaf, and the exposed roots. The small vine room is obsolete | Likely optimal |
| Opening Tree 1 | Hole Shelf | Uses the consecutive dripleaves | Likely slower than from Plateau Vine |
| Plateau Vine | Opening Tree 2 | Circles the spire while ascending to reach the taller red mushroom; requires a difficult jump from mushroom to dripleaf to vines | |
| Opening Tree 1 | Opening Tree 2 | Requires the same jump as Plateau Vine to Opening Tree 2. If using the consecutive dripleaves to ascend, then it requires waiting for the jump's dripleaf to reset | Likely slower than from Plateau Vine |
| Hole Shelf | Small Cave | Runs through the hole | Likely optimal |
| Secret Vine | Small Cave | Uses azalea and dripleaf to reach the red mushrooms | Likely slower than from Hole Shelf |
| Hole Shelf | West Ledge | Jumps to the dripleaf off of the platform toward the two red mushrooms, involves sharp turn dripleaf jump | |
| Secret Vine | West Ledge | Uses azalea and dripleaf to ascend and requires a dripleaf jump with a sharp turn | Likely slower than from Hole Shelf |
| Opening Tree 2 | West Ledge | Uses bounce across slime wall near lowest tree entrance | Obsoleted by other options |
| Hole Shelf | Central Peak | Uses hole and dripleaf crawlspace into secret room | |
| Opening Tree 2 | Central Peak | Straight across upper branch to mushroom | Likely slower than from Hole Shelf |
| Small Cave | Overlook | Pumpkin jam straight to exit vines | Optimal |
| Central Peak | Overlook | Bounces onto red mushroom and skips the small ledge to the right | Slower than from Small Cave |
| Central Peak | Back Branch | To mushroom, then slime bounce | |
| Opening Tree 2 | Back Branch | To mushroom, then slime bounce | Likely slower than from Central Peak |
| Overlook | Cyclone | Avoids the tree and uses the wall of dripstones instead | Likely optimal |
| West Ledge | Cyclone | Ascend by doubling back to mushroom bounce | Likely slower than from Overlook |
| Cyclone | End | Dripleaf circle; large cave is obsolete | Optimal |
| Back Branch | End | Bamboo wall to slime bounce to reach top of red mushroom on overlook | Slower than from Cyclone |
Sub-Route Optimizations[edit]
Opening Bend[edit]
Small Cave[edit]
Challenges[edit]
This map is featured in 0 challenges:
Trivia[edit]
- The map is named after a scrapped level from the prototype builds of Sonic the Hedgehog 3, which would be reimplemented in the sequel game Sonic & Knuckles as Mushroom Hill Zone.
- The map was designed to be beaten in just under one minute with a well-routed, but not-too-difficult path and a bit of practice.


